


NETVIGATOR


WIN 7 Error 651
The specified destination is not reachable.

Solution
- Make sure the modem’s cable has directly connected to the computer.
- Restart the modem (turn off the modem power for 15 seconds) and ensure that all cables have been connected.
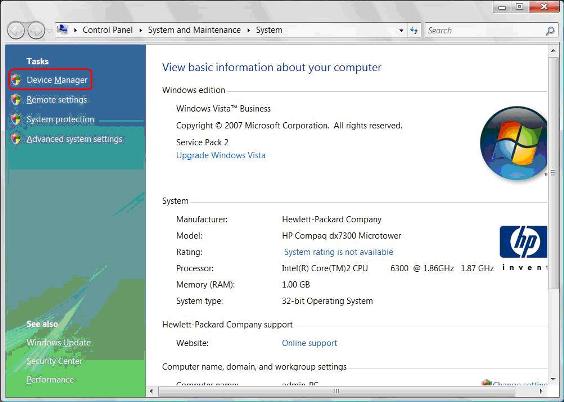
- Go to Control Panel → System → Device Manager.

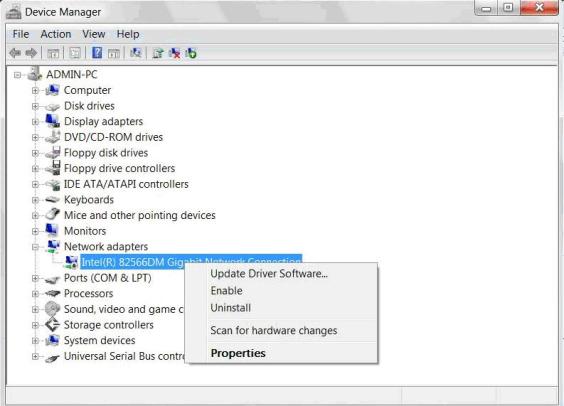
- Check the status of Network Adapter in “Device Manager” by pressing “+”icon.
- If the network adapter is “Disabled”, right click on that network adapter and choose “Enable”.

- Re-establish a new connection.
- Please restart the computer and modem (turn off modem power for 15 seconds) and ensure that all cables are properly connected.
- Make sure that no other computer, software, program or equipment occupies bandwidth.
- Please delete the brower's browsing history, Cookies and temporary files.
- Note: Signal interruption, signal reception problem or interference may occur if a wireless network is in use.
1. Please check the modem’s and computer’s cables are connected and the Internet has successfully been connected.
2. Open Internet Explorer, click "Tools" and check there is no "![]() “sign next to "Work Offline" .
“sign next to "Work Offline" .

3. Then click“Internet Options”

4. Click “Delete” under “Browsing history”

5. Press “Delete files”

6. Press “Yes”

7. Click “Connections” and then “LAN settings”

8. Make sure that "Automatically detect settings" and "Proxy server" are unchecked

9. Press “Start” and then “Connect To”

10. Press "Open Network and Sharing Center"

11. Press “Manage Network Connection”

12. Right click on “Local Area Connection” and then choose“Properties”

13. Click “Internet Protocol Version 4 (TCP/IPv4)”and then “Properties”

14. Make sure “Obtain an IP address automatically” and “Obtain DNS server address automatically” have been checked

15. Click “Alternate Configuration” and make sure “Automatic private IP address” has been checked. Finally, press “OK”.

MAC OS X 10.5 Create Dialer
1) Please click the "Apple" icon  which is on the top of the menu bar, and then select "System Preferences...".

2) In the “Internet & Network”, click the “Network” icon.

3) Please select the "Ethernet" and then click "Configure" button.

4) Select “Create PPPoE Service”

5) Enter “Netvigator Broadband” as Service Name.

6) Enter Netvigator Login ID and Password.

7) Then click connect.

MAC OS X 10.5 Could not connect PPPoE Server
The remote computer did not respond.

Solution
- Make sure the modem’s cable has directly connected to the computer.
- Restart the modem (turn off the modem power for 15 seconds) and ensure that all cables have been connected.
- Check the status of the network adapter to ensure it is enabled. If it is enabled, you will see “Connected”under “Ethernet” as shown in the picture below.

- Re-establish a new connection
MAC OS X 10.5 Authentication Failed
Access was denied because the username and /or password was invalid on the domain.

Solution
- Make sure NETVIGATOR account has not been suspended due to overdue payment.
- Make sure the user name (Login ID) ends with @ netvigator.com / @ hkstar.com and be reminded that the password is case sensitive.

- Make sure there is no concurrent login of broadband connection.
- Re-establish a new connection.
• Please restart the computer and modem (turn off modem power for 15 seconds) and ensure that all cables are properly connected.
• Make sure that no other computer, software, program or equipment occupies bandwidth.
• Please delete the brower's browsing history, Cookies and temporary files.
Note: Signal interruption, signal reception problem or interference may occur if a wireless network is in use.
Outlook Express & Microsoft Windows Mail:
1) Open "Outlook Express / Windows Mail"
2) Click <Tools> on the menu bar, then select <Accounts...> option
3) Outlook Express:
Click <Add...> button on the right and select <Mail...> to create an email account
Windows Mail:
Click <Add...> button on the right and select <E-mail Account> option for the account type, click <Next> button
4) Enter the [Display Name], click <Next> button
5) Enter your full email address in the [E-mail Address:] field, click <Next> button
6) Select <POP3> for the [Incoming e-mail server type:]
7) In the [Incoming mail server:] field, enter <pop.netvigator.com> and in the [Outgoing e-mail server(SMTP) name:] field, enter <smtp.netvigator.com>, click <Next> button
8) Enter the <E-mail username:> and <Password>, click <Next> button
9) Click <Finish> button to complete the email account setting
10) The following is for setting up SSL connection。Highlight the [Account] under [Mail] Category, then click <Properties> button on the right.
11) Select the tab [Servers], and Under [Outgoing Mail Server], tick the checkbox <My server requires authentication> and click <Settings...> button
12) Enable the radio button <Log on using>, and enter <E-mail username> with NETVIGATOR domain and the <Password>, click <Next> button
13) Select the tap [Advanced]
- Check [This server requires a secure connection (SSL)] for both Outgoing mail (SMTP) and Incoming mail (POP)
- Key in <465> for Outgoing mail (SMTP) port number
- Key in <995>for Incoming mail (POP) port number
14) Finally, Click <OK>, then click <Close> button to finish the email account setting

